In the previous articles you saw a Singlecall remote object and a Singleton remote object. In this article I will show you the usage of Generics in the remote object and how the server will register it and how the client will consume it. For the previous articles, from the web site's home page select the remoting section from the side bar and navigate. You will see the other good articles on this topic from other authors also.
Let us first begin with the server. I suggest that you first read the basic article here. It will be easy to understand this article once you know the basics.
Search Tags: Search the below tags in the downloaded application to know the Sequence of code changes.
//Server 0
//Client 0
2. The Generic Interface
Start a Visual C# console project called GenRemSrv. Once the project is started, add a generic interface. Our remote object will implement this interface. Below is the code:
//Server 001: Generic Interface which has only one method takes and
//generic type and return same kind of generic type
public interface IGenericIface
{
void AddData(T Data);
string GetData();
}
Note the usage of the Letter T. It indicates that the function accepts any data type. In our example we are going to use this interface for int as well as string data types.
3. Remote Class using Generic Interface
Add a new class to the GenRemSrv Project and Name it InputKeeper. Here, once again the T stands for some data type. Also note how the generic interface is inherited here by specifying the T substitution. Below is the code:
//Server 002: Public class that implements MarshalbyRef and the Generic interface
public class InputKeeper : MarshalByRefObject, IGenericIface<int> ,
IGenericIface<string>
{
Next the constructor and the variables required for this are coded. Below is the code for that:
//Server 003: Variable declaration
int CollectedInt;
string CollectedString;
//Server 004: Constructor
public InputKeeper()
{
CollectedInt = 0;
CollectedString = "";
System.Console.WriteLine("Input Keeper Constructoed");
}
Finally the interface functions are implemented as shown below:
//Server 005: Implement the Interface Function
public void AddData(int Data)
{
CollectedInt = CollectedInt + Data;
}
public void AddData(string Data)
{
CollectedString = CollectedString + ", " + Data;
}
public string GetData()
{
string str = String.Format("Collected integer sum {0}," +
"Collected String : {1}", CollectedInt, CollectedString);
return str;
}
In the above code, note that the Adddata function is implemented twice; once using the int data type and again using the string data type. As we derived the class from the generic interface that supports both the data types int and string (IGenericIface<int> , IGenericIface<string>) it becomes necessory to implement the interface generic function voidAddData(T Data); twice by substituting the required data types.
4. Hosting the remote objects
I hope you read my first article. I am not going to explain everything, which I already explained in the article here. As our remote object itself a generic object (InputKeeper), we need to register the object resolving the type T. In our case, we are using two different types integer and string and so we need two registerations. The code below registers the InputKeeper for both the data types on the TCP channel identified by the port 14750.
//Server 007: Register the TCP channel with port number 14750
TcpServerChannel port = new TcpServerChannel(14750);
ChannelServices.RegisterChannel(port, false);
//Server 008: Register the remote objects. Note the generic is split based
// on the type usage
RemotingConfiguration.RegisterWellKnownServiceType(typeof(InputKeeper<int>),
"IntKeeper", WellKnownObjectMode.Singleton );
RemotingConfiguration.RegisterWellKnownServiceType(typeof(InputKeeper<string>),
"StringKeeper", WellKnownObjectMode.Singleton);
//Server 009: Some indication that server is started
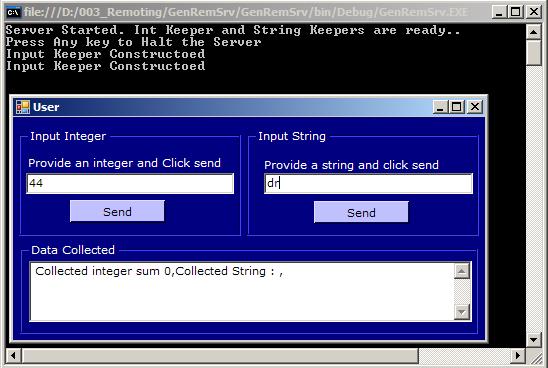
Console.WriteLine("Server Started. Int Keeper and String Keepers are ready..");
Console.WriteLine("Press Any key to Halt the Server");
Console.ReadLine();
5. The client application
Add a new visual C# windows application and Name the project Generic User. Use the File add new project without closing the server project so that both the projects are available under a solution. The form design is shown below:
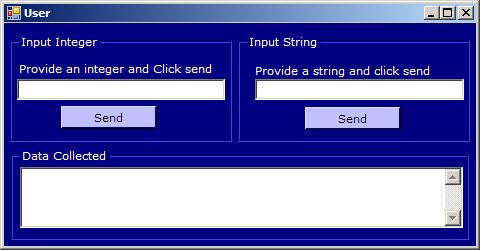
The first send button will contact the generic remote object for integer and second send button will contact the generic remote object for string. The data collected will be displayed on the multi-select list box. Also note that we have two generic objects on the server's remote pool and they are independent. Enter some integer on the left group box and click send button and type some other integer then click the send button again. Do the same for the string also. This is just for the test and data is persisted on each object in their contexts and we registered the object as singleton.
Provide the reference for Remoting runtime and the server project as we already did in our first .Net remoting project. The reference to that article is given in the introduction section.
1) Include the following Namespace for the form code:
//Client 001: Namespace inclution
using System.Runtime.Remoting;
using System.Runtime.Remoting.Channels;
using System.Runtime.Remoting.Channels.Tcp;
using GenRemSrv;
2) Client declared generic interfaces. One interface is for integer and the other one is for string. The integer interface is used by the left send button click and right send button will use string interface.
//Client 002: Object declaration using the generic types
private IGenericIface<int> intObject;
private IGenericIface<string> stringObject;
3) In the Form Load event handler, after registering the communication channel, the remote objects are retrieved (Proxy) and strored in the interface class members declared in the previous step.
//Client 003: Register the Communication channel
ChannelServices.RegisterChannel(new TcpClientChannel(), false);
//Client 004: Get the generic remote object of int type and string type
intObject = (IGenericIface<int>) Activator.GetObject(typeof(IGenericIface<int>),
"Tcp://localhost:14750/IntKeeper");
stringObject = (IGenericIface<string>) Activator.GetObject(typeof(IGenericIface<string>),
"Tcp://localhost:14750/StringKeeper");
4) The left and right send buttons will make a call to the relevant remote object (Generic object). Remember, the function exposed by our remote generic interface is AddData and GetData. The AddData for integer simply performs summation of supplied integer and AddData for string will simply append the given string input. Note that for simplicity I collected the data in string and integer variables in the server. Collecting the input in a variable of Type T should do the proper implementation. For simplicity I used CollectedInt and CollectedString. However, I hope this will explain how to use generic remote objects in remoting environment. The code below is for the Send button click handlers:
//Client 005: Parse the data entered in the integer input and send it to the remote object
private void btnSend1_Click(object sender, EventArgs e)
{
int input;
if (int.TryParse(txtInt.Text, out input) == true)
{
intObject.AddData(input);
}
txtOutput.Text = intObject.GetData();
}
//Client 006: send the string data to the remote object
private void btnSend2_Click(object sender, EventArgs e)
{
stringObject.AddData(txtString.Text);
txtOutput.Text = stringObject.GetData();
}
Running the application is shown below:
 Download Files:
SPONSORS:
No comments:
Post a Comment