The following software will be installed and integrated for
this setup: Visible Studio room Team Foundation Hosting server 2012, SQL
Hosting server 2012 Business, Windows Hosting server 2012, and Visible Studio
room 2012 Ultimate, Windows 8 Business x64, SharePoint Hosting server 2013,
SharePoint Designer 2013 (64-bit) Preview, and Oracle Virtual Box.
Note that in this article I did not use SharePoint 2013
Preview. This setup uses the actual SharePoint 2013 RTM version and is not a
later "rename" so you can be guaranteed that all the situations
experienced and workarounds made herein all come from, and was done for, the
RTM version of SharePoint 2013 from the time this article was first written.
My own way of setting-up a SharePoint 2013 development
virtual machine wherein I wanted to have it clean and recoverable anytime just
in case I made a mess trying out something. No unnecessary configuration or
additional installation have been done to make sure SharePoint 2013 will be
open to future changes and will have testing results that are not affected by
these unnecessary configurations. Additional changes are done on the
differencing disks and can conveniently be removed after testing purposes.
I will use some images in these steps to facilitate
navigation within the new Metro-style interface for some functionalities that
may be diffcult to access, but I urge you to check with Google first before
doing the steps that are not clear to you so you avoid making any mistake in
configuration that you will have no choice but to rollback to previous snapshot
with some of your earlier changes lost. The steps will provide a way for you to
recover from these mistakes by using snapshots, but it is still better to avoid
them in the first place by double checking from Google.
Minimum hardware requirements for SharePoint 2013:
8GB RAM - Not a "hard" requirement. I use lower
than this for development with no problem so far.
x64 with 4 CPU Cores
80GB for System Drive
Since this setup requires hardware and software that are on
the higher end of the market, please make sure to review the requirements and
try to meet the minimum requirement as possible. For example, if you plan to
additionally install Project Server 2013 in this VM it would seem that 8GB is
still okay for its SQL Server small dataset use, but it is expected to crawl at
this memory capacity especially when combined with other servers (it requires
24GB for the three tiers). So it’s recommended to get 16GB or more if you plan
to have all the servers mentioned in this setup to be integrated. Project
Server 2013 will not be installed in this VM since (1) it is not directly for
development purposes and (2) it has a steep requirement as mentioned.
On the contrary it would seem that the published
requirements for this setup are steep even for development purposes, but there
are a lot of discussions that this setup can run on the same minimum hardware
requirements as SP2010 and even the earlier MOSS 2007. So in general, if you
are just doing development you can get away with not meeting the minimum
requirements as long as the installation doesn’t prevent you...but you just
have to be patient with the performance though.
I have tried to run this at 2GB with essential components
still capable of running (you'll get a lot of time-outs in Sharepoint though,
even at Central Admin, and numerous services fail to start). The most stable
minimum I can get is 4GB and the response time is quite acceptable for
development. The best minimum is still 8GB for the guest OS, but with a 6GB guest
my 8GB host is still able to breathe (using the SSD as page file) like it still
has extra memory to spare. Then again, 16GB host memory is recommended.
In the last section we are going to network three laptops
(one server, two client) to verify the connectivity and security setup.
Steps
I. Preparation
Please review the Required Hardware And Software For
Sharepoint 2013. This is a necessary read as the following steps will
eventually fail if you do not comply with SharePoint's requirements.
http://technet.microsoft.com/en-us/library/cc262485(office.15).aspx
II. Setup Host
Setup Common Laptop Host: Windows 8 Enterprise x64. You can
use any other host operating system as long as it supports the requirements of
the virtualization software we are going to use.
Install Virtualization Software
Install on the Host: Oracle VirtualBox
https://www.virtualbox.org/
Create VM:
We will name our VM as SP2013DEV.
Set the VM type to VDI, memory to 4GB, storage capacity to
120GB, disk type to Dynamic. Set the Boot Order to CD/DVD-ROM and then Hard
Disk only.
Set the number of Processors equal to the number of CPU
Cores you have. This will equally share the cores to the VM.
Select the Microsoft Windows version to "Windows 2012
(64 bit)".
Set the Video Memory to maximum possible. Also install the
latest Oracle VM VirtualBox Extensions.
Note: Do not make any non-essential configuration changes
unless it is a pre-requisite of subsequent required installation.
When all installations has been performed, we will begin
making snapshots so we can recover from any mistakes or errors in
configuration.
We will then baseline the finalized configuration before we
do a differencing disk that we can freely use for any development purposes to
our heart's content.
III. Install VM Guest
Install Windows Server 2012
Set the password to any Setup Account you use in development.
When the installation has been completed, perform the
following:
You will receive a prompt to enable Windows SmartScreen.
Just set it to warn you so you can cancel in case you don't intend to run
something.
Install Guest Additions by going to Devices\Install Guest
Additions. This will make the host and guest operating system integration
seamless. Turn off the guest.
Modify the Machine\Settings on the VirtualBox Manager while
the VM is Powered Off.
If you want your DEV VM to be accessible from Remote
Desktop:
Check the "Enable Server" in the Display\Remote
Display.
Note: Make sure the Server Port is unique from all the other
VMs to avoid any conflict when you run more than one VM in a client-server
testing scenario for example.
Check "Enable Server" with Authentication Method
as "External".
Create a new Host\Windows User Account such as
"VirtualBox User" with Administrator and Remote Desktop access
rights. This is the account to use for RDP access.
If you want your DEV VM to have permanent access to its Host
Drive:
Set the Shared Folders\Add Share
Set the folder path to "C:\" with name
"HOST_ROOT" as Auto-mount and Make Permanent.
Run the DEV VM again.
Turn off Internet Explorer Enhanced Security.
Go to Server Manager. In case you closed it, just click the
icon at the lower leftmost where the Start button is usually located.
Click "Local Server" on the left navigation menu.
On the page that appears, you will notice on the Properties
that there is an item "IE Enhanced Security Configuration" set to
"On". Just click the "On" hyperlink to open a pop-up.
Set IE ESC to "Off" for both Administrators and
Users so you will not be bothered by this during development.
Notice that on the Properties page IE ESC seems to remain
"On". This is because it's still waiting for the status refresh. To
quickly verify you change, click back on the "Dashboard" on the
navigation menu and then click "Local Server" again. You will notice
that the status changed to "Off".
If you want to have a useful development environment, set
the following:
Open Windows Explorer from the Taskbar. Click "Expand
the Ribbon" which is an icon shown as an "arrow pointing
downward" beside the "question mark" icon on the upper right
side of the window, below the window controls.
On the Ribbon, click the View tab and then click the Options
button. On the Folder Options pop-up, click the View tab.
Disable: Hide Empty Drives In The Computer Folder.
Disable: Hide Extensions For Known File Types.
Disable: Hide Protected Operating System Files.
Enable: Launch Folder Windows In A Separate Process.
IV. Install SQL Server 2012 Enterprise
After inserting the DVD from the host drive and selecting
the drive on the VM, click the pop-up to display disc actions and select
"Run Setup.Exe".
Review the Planning\Requirements. Click
"Installation" link on the navigation menu and select "New SQL
Server stand-alone installation...".
You can temporarily turn-off Windows Firewall in the Local
Server\Properties of the Server Manager if you want to make sure SQL Server
installation will not encounter problems, but this is unnecessary.

Select
All Features With Defaults for installation. Note that in the Features list the
"Reporting Services Add-in for SharePoint Products"
is unchecked. Check it (or click Select All) because we will be runningSharePoint in this server.
Customize both the Database
Engine and Analysis Services Collation to Latin1_General, Case-insensitive,
Accent-sensitive, Kana-sensitive, and Width-sensitive.


A. Add a SQL Server authentication password for
system administrator. Most of the time you will not use Windows authentication
for SQL server connections.
B. It will be a very good idea if you can
customize your Data Directories for performance (which is out of topic).
However since we are setting-up for development and exchanging
"high-performance" with "recoverable" VM just leave the
settings as-is.
C. Add the SYSTEM account to SQL Server Analysis
Services administrators to avoid system errors for a domain-configured server.
D. Add your administrator account for
administrative users.
E. Install the Sharepoint integrated
mode default configuration for the report server.


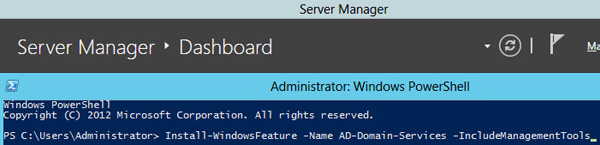
V. Install Active Directory Domain Services
- Use PowerShell command as
PS C:\Users\Administrator> Install-WindowsFeature -Name AD-Domain-Services -IncludeManagementTools
on the Guest OS. You can very easily access PowerShell on the new Windows Server 2012 Taskbar. Wait for the installation progress to complete.
- The goal for this installation is to have an Active Directory to be used with Sharepoint Server 2013. This is a common corporate scenario.
- When the installation completes verify that the Success status is set to "True" and Exit Code is "Success". You will get a warning if your Windows Update is disabled but you can enable it later.

- Enter
Get-Command -Module ADDSDeployment
to verify successful installation and view availableADDSDeploymentcmdlets. - Enter
Test-ADDSForestInstallation –DomainName
to verify if your forest installation will be successful or not, and if you will have warnings that you need to work on or just ignore. Enter and confirm your Administrator password.-NoDNSOnNetwork -ForestMode Win2012 -InstallDNS:$True -NoRebootOnCompletion:$True - If you want to know what the installation will do, enter
Install-ADDSForest –DomainName
This is not a necessary step though.-NoDNSOnNetwork -ForestMode Win2012 -InstallDNS:$True -NoRebootOnCompletion:$True -WhatIf - Enter
Install-ADDSForest –DomainName
Confirm your Administrator password. Press "Y" and ENTER to continue installation.-NoDNSOnNetwork -ForestMode Win2012 -InstallDNS:$True -NoRebootOnCompletion:$True - Make sure that the Status specifies "Success". Restart the VM. Note that we could have removed the "
-NoRebootOnCompletion:$True" parameter however this allows you to do some additional things before you shutdown, such as enable your Windows Update. - You may be required upon logon to change your password for domain purposes. Notice that your domain host (e.g., "sphost\Administrator") is included in your logon account display. You can verify your domain settings by looking at "Server Info"\"Computer Name, Domain, and Workgroup Settings", which is also accessible from "Control Panel\System and Security\System".
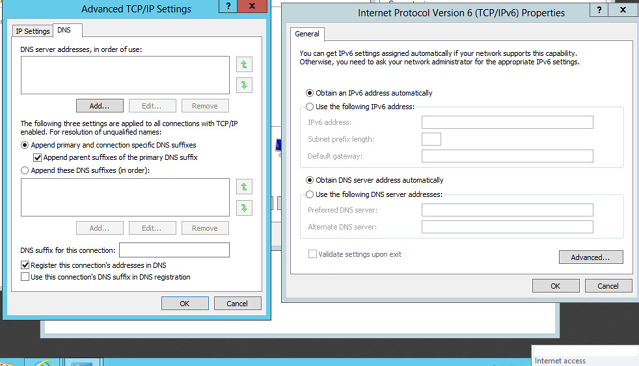
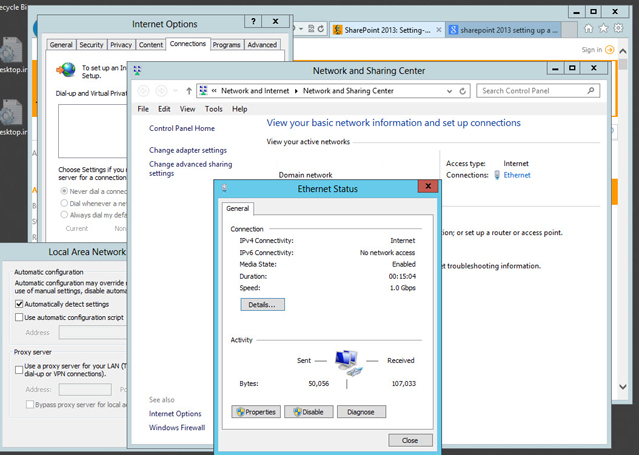
- You may encounter a situation wherein you are not able to connect to the Internet. What happens is that when you configure your AD Forest, Windows 2012 automatically expects all Internet traffic should be rerouted to this domain and that the domain is able to serve as a gateway to the Internet, meaning the domain can (or will later) have a DNS Server is spite of the "-NoDNSOnNetwork" switch we added. Note that installing and configuring a DNS Service is out of topic for this article, and there are already articles specifically for Windows 2012 that can help you with this. For now just make sure you reconfigure your Internet connection back to its original state by making sure there is no rerouting occurring on your network settings.

VI. Install Sharepoint Server 2013
- Install SP2013 Pre-requisites. Allow the guest system to reboot.
- Install SP2013. After completing installation allow the Configuration Wizard to run.
- Configure SP2013 using Configuration Wizard.
- Create a new Server Farm.
- Provide the machine name of the Guest OS to search for SQL Server default installation. Enter your domain account (e.g., "sphost\Administrator").
- Provide a Passphrase required for joining servers. Specify a Central Admin port number and choose NTLM Security for now.
- Verify the configuration and click next.
- After successful configuration, the SP Central Administration website will open. Run the Farm Configuration Wizard in the Central Admin.
- Use the Active Directory Users and Computers (easily accessible using Windows Search) to create a new Service Account, or use your existing Administrator Account but not recommended.
- Skip creation of Site Collection. Verify that the configuration is completed.
VII. Install Visual Studio 2012 Ultimate
- Accept the Licence Agreement and click Next. Remove installation components you are sure you will not use (make sure to keep Microsoft SharePoint Development Tools), then click Next...but hey wouldn't you want to try the "new" stuff listed?
" src="http://www.codeproject.com/script/Forums/Images/smiley_smile.gif" />
- Verify selected components and then click "Next". Wait for the installation to complete.
- Launch Visual Studio 2012 to verify installation.
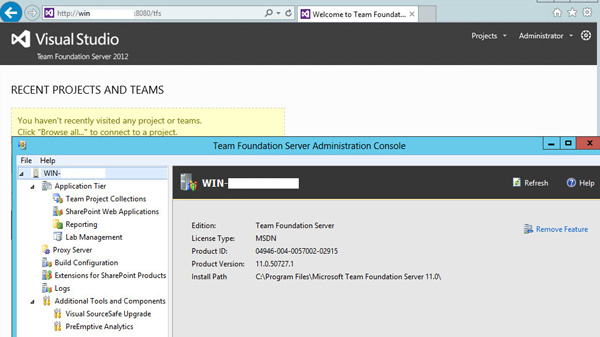
VIII. Install Visual Studio Team Foundation Server 2012
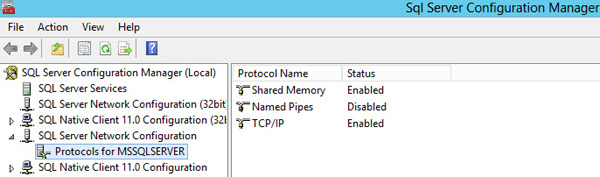
- Make sure TCP/IP in SQL Server is enabled before installing TFS. This will guarantee a SharePoint site can be created for the team project collection.
- On the Configuration Center select Configure Team Foundation Application Server\Advanced in order to configure reporting and team project portal. Click Next.
- Test you pre-selected SQL Server Instance. You can make modifications to this setting before clicking Next.
- Select a Service Account and Authentication Method, or just keep the default settings and click Next.
- Unless you have a specific configuration plan you can leave the pre-set port and directory name and click Next.
- Configure Reporting for use with TFS and click Next. Click "Populate URLs" to autofill the settings, then click Next.
- Click "Test" to be able to verify connection and integrate with SSAS.Note: You may notice that SSAS is not running even when it is set to run automatically. There is an issue with this that "SQL Server 2012 installation configured [NT Service]\MSSQLServerOLAPService [account] to start the [Analysis] Services but somehow the user is not created in [] Windows" (http://social.msdn.microsoft.com/Forums/en-US/sqlanalysisservices/thread/fd889d6b-a42a-406c-8757-22f26f94a2ad/). However KB224973 may still be an issue with using Local System so to work around on this I used my domain administrator account although I am not sure if this is the best approach. There is also an option to add the MSSQLServerOLAPService account to SQL Server logins but this will not work if the service account is not created in the first place. In any case you can totally change this later.
Also, in case you are wondering, the password of NT Service\MSSQLServerOLAPService is "MSSQLServerOLAPService" and I guess this goes for the rest of the automatically-configured service accounts. - Create a Domain User account (non-administrator like sp2013dev\reports_user) with minimal rights to be a Report Reader account.
- Unless your SharePoint server is remote or customized, you can just select "Use the defaultSharePoint location" and click Next.
- Enter a name like "TFSCollection" (or use the default) and optional description like "Team Project Collection" for the new TFS site collection and click Next.
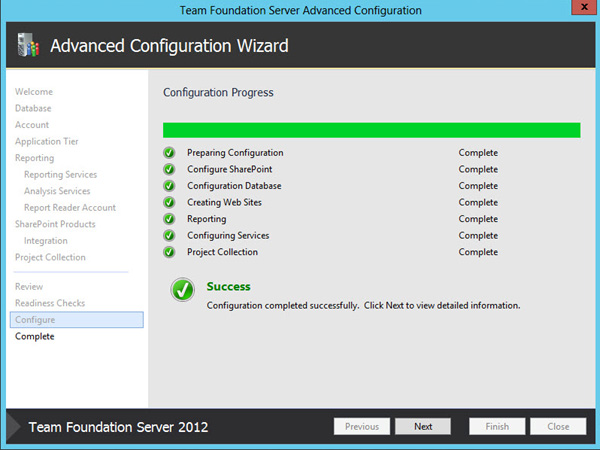
- Run a readiness check before the configuration is performed. Resolve SID conflict by typing on windows command prompt:
sqlcmd -E -S "
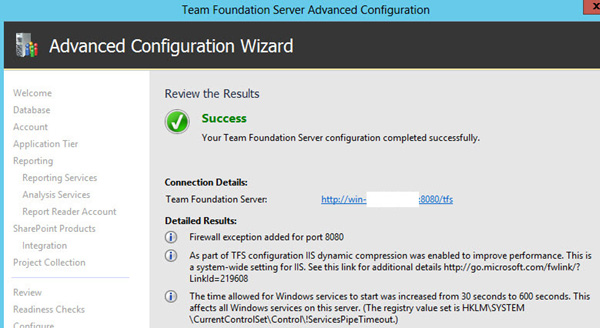
The Readiness Check already provides the correct command." -Q "ALTER LOGIN [\Administrator] WITH NAME = [ \Administrator] - Click "Configure" to start the configuration process. Upon successful configuration make sure you check the Detailed Results for important information.
IX. Install Developer Tools and Updates
- Microsoft SharePoint Designer 2013 (64-bit) Preview. Don't worry, the preview version is much the same as the release version so it wouldn't hurt adding this to the baseline. You can just replace it later without any hassle.
- Windows Server 2012 and SQL Server 2012 updates from Windows Update.
- VirtualBox updates.
- Microsoft SQL Server 2012 Feature Pack (http://www.microsoft.com/en-us/download/details.aspx?id=29065)
- Windows PowerShell Extensions for Microsoft SQL Server 2012. Note that the SQL Server 2012 Management Objects are already installed and don't need to be reinstalled.
- Anything else you might need. Note: Since this is a baseline don't install anything that might not be needed for your general development purposes.
X. Baseline.
- Make sure to install Guest OS updates using Windows Updates. Restart the Guest OS for baselining purposes.
- Perform Disk Check and Defragment System Files.
- Make a backup of your virtual hard disk. I prefer two backups located in two different storage locations for higher recoverability. This has always been my setup for virtual hard disks.
- Open "Virtual Media Manager" and select the SP2013DEV.vdi file.
- Click the Copy button. Click next to go to "Virtual disk file type" and select VDI type. Click Next.
- Select "Dynamically allocated" and click Next.
- Select the file name of the new VDI and its download destination. Click Next and then click the Copy button to start the copy process.
- Repeat steps 1 to 4 as needed.
- Update the existing virtual machine to toggle the virtual hard disk as a baseline. Only snapshot of changes will be created by the VM and the baselined hard disk will not be modified anymore.
- Select the SP2013 virtual machine from Oracle VirtualBox Manager.
- Right-click the VM and select Settings. On the Settings window select Storage. On the Storage Tree right-click on the SP2013 VHD on the SATA Controller and select "Remove Attachment".
- Once the VHD attachment is removed click OK to close the Settings window
- Open "Virtual Media Manager" and select the SP2013DEV.vdi file.
- Click the Modify button and select Multi-attach. Click OK.
- Close "Virtual Media Manager". Select the SP2013 virtual machine again from Oracle VirtualBox Manager.
- Right-click the VM and select Settings. On the Settings window select Storage. On the Storage Tree add a SATA Controller using the Add Hard Disk icon (stacked plates with plus sign).
- Click "Choose existing disk" and select the VHD from the filesystem. Click Open.
- Verify that the "Type (Format)" Information for the VHD is "Multi-attach (VDI)" instead of "Normal (VDI)". Click OK to close the Settings window.
- At this point you have now baselined the VHD. Any changes you made within the VM is stored separately as a snapshot. The baselined VHD is not modified in any way.
- Create additional Virtual Machine(s) that use the existing virtual hard disk as permanent baseline, or Clone the existing VM itself.
It is useful if you have a stable development VM (the original VM in our case). But what if you want to have an extra VM to test new installations and configurations (that may be difficult to uninstall or un-configure) and make sure it will work out first with the baseline? The solution is to add a new/temporary VM that will use the same baseline. I won't detail how to do this because this is optional and there are lots of VirtualBox topics that cover this already, just know that this is possible plus a whole lot more.
XI. Network Two/Three Laptops and Enable RDP Access.
- There are different approaches that you can do to enable this, but since you can do them all I will just explain it to you in sequence (because that's what I did). Note that there are serious security implications involved in these approaches. This is DEFINITELY not a recommended approach if you will implement this kind of connectivity in a workplace environment, moreso a public exposed network. However if you know what you are doing and you know the "gates" where your network will be accessed, then it is logical to make your network "insecure from the inside", but "secure from the outside". This means that bytes can freely roam within your network especially if it is a home network or air-gapped, but make sure you have only a single point of exposure to the outside world (gateway) that is highly secured and outside devices cannot connect to your network. And here is how to do it.
- First, make sure that your single point of connection to the Internet is defined. This can either be a wireless router in my case or any other gateway. Configure this gateway in such that connections coming from the Internet cannot be established going inside the network, and that connections coming from the network are filtered going to the Internet. If you can maintain this model, it doesn't matter if your network devices are not secure themselves.
- Supposing we have "Laptop A" with Windows 7 Ultimate x64, "Laptop B" with Windows 8 Enterprise x64, and "Laptop C" with Windows XP x32 laptops. Obviously the SP2013DEV VM that we want to access is located in Laptop B but we want the Laptop A (Windows 7 x64) and Laptop C (Windows XP x32) to be able to access SP2013DEV in Laptop B.
- If we don't have a wireless router, or worse, even a wired router, for example when we are on the move, what we can do is to setup network cables. I won't go into the details because there are many approaches to this. In cases that you don't have any router what you can do is to make a Laptop see the other laptop as a gateway so that they will be able to communicate with each other (device-gateway relationship). Another way is to "Bridge" but I prefer the former approach since it is faster. With this setup you can have a network with two laptops (no router involved) connected to each other. I will have this topic separately on "Connecting Two Laptops Using A Network Cable", but there are already lots of topic available about this.UPDATE: I have a separate topic "Internet Connection Sharing (ICS) from a Laptop-Connected Internet USB Dongle to Multiple Devices using ordinary Wireless Router without setting-up a DNS" which provides the option of enabling SP2013DEV to be accessed by more devices PLUS an available Internet from a single (cheap/free) source.
- Second thing we do is to setup Windows 8 homegroup so that the Windows 8 and Windows 7 laptop can trust each other as part of a single home network. This will make the connection much smoother not only for the RDP Access. As for the Windows XP laptop, configure the Workgroup of the three laptops as one. Placing all the laptops into one workgroup has many advantages which I will not explain here since it's out of topic.
- Configure VirtualBox VRDP
- Install the latest Oracle VirtualBox Extension Pack that is compatible with the version of VirtualBox you have installed. The Extension Pack will contain the VRDP server that is not part of the VirtualBox installer.
- On the VirtualBox Manager right click on the SP2013DEV VM and select Settings. On the Display section click on the Remote Display tab. Take note that we have already configured this early in this setup guide. However since we are on a development platform and would like to avoid unnecessary security hurdles we will make the Authentication Method as "Null" instead to make it work first. We will also Allow Multiple Connections for this purpose so we can connect from two laptops simulatenously (there are time this will get funny/annoying when two people are using it). Click OK.
- Our goal right now is to enable development, not to implement unnecessary security. I will have another article that will cover configuration of security so you can access your development environment from the Internet.
- Use Microsoft Terminal Services Console (MSTSC.EXE a.k.a. Remote Desktop Client) to connect using RDP.
- First test the connection using Laptop B by entering on the Remote Desktop 127.0.0.1:3389 where 127.0.0.1 is a loopback address and 3389 is the default port assigned to the VM. To verify if this is your port number: while SP2013DEV VM is running, on the Machine Menu select the Session Information and view the Remote Desktop Server Port. Test if the connection does not require login and if it successfully connects to the VM. Do not close the connection yet.
- Now connect using Laptop A and Laptop C simultaneously by entering on the Remote Desktop [Laptop B Static IP Address]:[SP2013DEV VM VRDP Port]. Where Laptop B Static IP Address is the IP address of the "Host" OS, since this is where RDP client will connect to, and not on the Guest OS. Use IPCONFIG on the host windows console. For DHCP check your router's assigned IP address.
- Once you have confirmed that all three laptops can connect to the VM using RDP you can close them all. This means you can now access your SP2013DEV from any laptop that is part of your local network.
At this point you now have created a single stable, recoverable, and revertable VM in your laptop with a full-blown Sharepoint 2013 development platform.
There you have it: A Clean And Recoverable SharePoint 2013 Development VM. Thanks for reading and making this your reference. Good luck and happy development! ![Smile | <img src=]() " src="http://www.codeproject.com/script/Forums/Images/smiley_smile.gif" />
" src="http://www.codeproject.com/script/Forums/Images/smiley_smile.gif" />
SPONSORS:
No comments:
Post a Comment