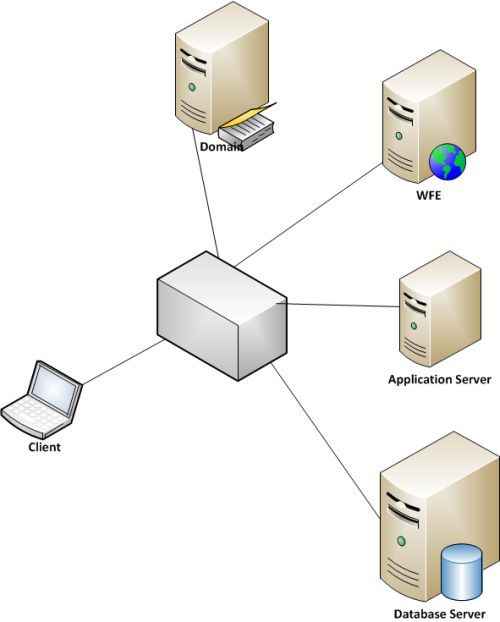
Here we are describing the farm architecture containing the following servers:
- Domain(DC1): One computer running Windows Server 2008 R2 Enterprise Edition that is configured as an intranet domain controller.
- Database Server (SQL1): One intranet member server running Windows Server 2008 R2 Enterprise Edition that is configured as a SQL database server.
- Application Server (APP1): One intranet member server running Windows Server 2008 R2 Enterprise Edition that is configured as the SharePoint Server 2013 Preview application server.
- Web Frontend Server (WFE1): One intranet member server running Windows Server 2008 R2 Enterprise that is configured as the SharePoint front-end web server.
- Client Machine: One member client computer running Windows 7 Enterprise.
The following architecture diagram explains the farm described above. I am not covering the part of the installation of Windows on servers as well as the domain configurations. Here we are covering only the SharePoint and SQL Server part. All thoughout the document I am using a generic user id and password. You can use a different generic account for production purposes.
 Install SQL Server 2012 on Database Server
Install SQL Server Prerequisites
To install the .NET Framework 3.5:
Install SQL Server 2012 on Database ServerInstall SQL Server Prerequisites
To install the .NET Framework 3.5:
- On APP1 (or the computer on which SQL Server 2012 Enterprise is being installed), log on with the Service account.
- In Server Manager, click Features, and then click Add Features. This will launch the Add Features Wizard and you will see the Select Features screen.
- Select .NET Framework 3.5.1 Features. This will bring up a box that states: "You cannot install .NET Framework 3.5.1 Features unless the required role services and features are also installed.". Click Add Required Features. The box will disappear. On the Select Features screen, click Next.
- On the Web Server (IIS) screen, click Next.
- On the Role Services screen, click Next.
- On the Confirm Installation Selections screen, click Install. This will begin the installation.
- On the Installation Results screen, click Close.
Install SQL Server 2012 Enterprise
In this procedure, you install SQL Server 2012 Enterprise.
To install SQL Server 2012 Enterprise
- On APP1 (or the computer on which SQL Server 2012 Enterprise is being installed), navigate to the directory that contains the SQL Server 2012 Enterprise binaries and double-click Setup.EXE. This will launch the SQL Server Installation Center.
- On the SQL Server Installation Center, on the left, click Installation.
- On the right, click New installation or add features to an existing installation. This will launch the SQL Server 2012 Setup.
- On the Setup Support Rules screen, click OK. This will close the Setup Support Rules screen and will bring up the Product Key screen. From Specify a free version, select Evaluation. Click Next.
- On the License Terms screen, read the Licensing terms, place a check in the box next to I accept the license terms and click Next.
- On the Setup Support Files screen, click Install. This will take a few moments to complete. Once this completes the Setup Support Rules screen will appear again.
- On the Setup Support Rules screen, click Next.
- On the Setup Role screen, select SQL Server Feature Installation and click Next.
- On the Feature Selection screen, under Instance Features place a check in Database Engine Services, under Shared Features place a check in Management Tools - Basic and Management Tools - Complete. Click Next.
- On the Installation Rules screen, click Next.
- On the Instance Configuration screen, click Next.
- On the Disk Space Requirements screen, click Next.
- On the Server Configuration screen, next to SQL Service Agent under Account Name, Service account and Password.
- On the Server Configuration screen, next to SQL Server Database Engine under Account Name, Service account and Password.
- Click Next.
- On the Database Engine Configuration screen, click Add Current User and click Next.
- On the Error Reporting screen, click Next.
- On the Installation Configuration Rules screen, click Next.
- On the Ready to Install screen, click Install.
- On the Installation Progress screen, wait until the installation completes.
- On the Complete screen, click Close.
- Close the SQL Server Installation Center.
Next we can n verify the installed SQL Server services are running.
To verify that the installed SQL Server services are running:
- Click Start, select Administrative Tools, and click Services.
- Scroll down to SQL Server (MSSQLSERVER) and verify that it has a status of Started.
- In Services, right-click SQL Server Agent (MSSQLSERVER), and click Start. This will start the SQL Server Agent.
- When this completes, verify the SQL Server Agent (MSSQLSERVER) has a status of Started.
- Close Services.
To connect to SQL Server 2012 Enterprise using SQL Server Management Studio:
- Click Start, click All Programs, click Microsoft SQL Server 2012, and click SQL Server Management Studio.
- On the Connect to Server dialog box, under Server Type: select Database Engine.
- On the Connect to Server dialog box, under Server name: select APP1 (or the computer on which SQL Server 2012 Enterprise is being installed).
- On the Connect to Server dialog box, under Authentication: select Windows Authentication.
- Click Connect. This should be successful and the database information will be displayed on the left. The SQL Server Agent should have a green arrow.
- Close Microsoft SQL Server Management Studio.
Configure the Windows Firewall for an inbound rule
- On SQL1, log on using the Service account.
- From the Desktop, click Start, point to Administrative Tools, and then click Windows Firewall with Advanced Security.
- In the tree pane, right-click Inbound Rules, and then click New Rule.
- On the Rule Type page, click Port, and then click Next.
- On the Protocols and Ports page, type 1433-1434 in Specific local ports, and then click OK.
- On the Action page, click Next.
- On the Profile page, click Next.
- On the Name page, types SQL Server TCP ports in Name, and then click Finish.
Install SharePoint Server 2013 Preview on APP1
In this procedure, you install the prerequisite software components for SharePoint Server 2013 Preview on APP1.
To install the SharePoint Server 2013 Preview prerequisite software:
In this procedure, you install the prerequisite software components for SharePoint Server 2013 Preview on APP1.
To install the SharePoint Server 2013 Preview prerequisite software:
- On APP1, log on using the service account.
- Connect APP1 to a network that has Internet access and configure the TCP/IP protocol on the Local Area Connection as needed. The SharePoint Server 2013 Preview prerequisite installer must download and install the components from the Microsoft Download Center.
- On APP1, navigate to the location that contains the SharePoint Server 2013 Preview installation files and double-click SharePointServer.exe (for the downloaded evaluation version) or default.hta on the SharePoint Server 2013 Preview product media.
- On the SharePoint Server 2013 Preview Start page, click Install software prerequisites.
- On the Welcome to the Microsoft SharePoint Products Preparation Tool page, click Next.
- On the License Terms for software product page, review the terms, select the I accept the terms of the License Agreement(s) check box, and then click Next.
- On the Installation Complete page, click Finish.
- On the Installation Complete page, click Finish.
To install SharePoint Server 2013 Preview
- Click Start, click All Programs, click Microsoft SQL Server 2012, and then click SQL Server Management Studio.
- In Connect to Server, click Connect.
- In SQL Server Management Studio, in the tree pane, open Security.
- Right-click Logins, and click New Login.
- In Login - New, Service account and password
- In the Select a page pane, click Server Roles.
- In the Server Roles pane, select dbcreator, and then click OK.
- Close SQL Server Management Studio.
- On the SharePoint Server 2013 Preview Start page, click Install SharePoint Server.
- On the Enter Your Product Key page, enter your product key as needed, and then click Continue.
- On the Read the Microsoft Software License Terms page, review the terms, select the I accept the terms of this agreement check box, and then click Continue.
- On the Server Type tab, click Complete, and then click Install Now.
- When Setup finishes, a dialog box prompts you to complete the configuration of your server. Ensure that the Run the SharePoint Products and Technologies Configuration Wizard now check box is selected.
- Click Close to start the configuration wizard.
- On the Welcome to SharePoint Products page, click Next.
- In the dialog box that notifies you that some services might need to be restarted during configuration, click Yes.
- On the Connect to a server farm page, click Create a new server farm, and then click Next.
- On the Specify Configuration Database Settings page, type SQL1 in Database server, type Service account and Password, and then click Next.
- On the Specify Farm Security Settings page, type the Passphrase and Confirm passphrase, and then click Next.
- On the Configure SharePoint Central Administration Web Application page, click Next.
- On the Completing the SharePoint Products Configuration Wizard page, click Next.
- On the Configuration Successful page, click Finish. Internet Explorer launches with a tab named Initial Farm Configuration Wizard.
- The Working on it page might display for a while before it completes.
- In the Help Make SharePoint Better dialog box, click No, I don't wish to participate, and then click OK.
- On the Configure your SharePoint farm page, in Service account, click Use existing managed account, and then click Next.
- On the Create Site Collection page, click Skip.
- On the This completes the Farm Configuration Wizard page, click Finish. The Internet Explorer tab shows the SharePoint 2013 Central Administration site, from which you can configure and manage the SharePoint server. Leave Internet Explorer open.
To install the Web Server (IIS) server role on WFE1
- In the console tree of Server Manager, click Roles. In the details pane, click Add Roles, and then click Next.
- On the Select Server Roles page, select Web Server (IIS), and then click Next three times.
- Click Install.
- Verify that the installation was successful, and then click Close.
Install SharePoint Server 2013 Preview on WFE1
Here we can install the prerequisite software components for SharePoint Server 2013 Preview on WFE1.
Here we can install the prerequisite software components for SharePoint Server 2013 Preview on WFE1.
- On WFE1, log on using the Service account.
- Connect WFE1 to a network that has Internet access and configure the TCP/IP protocol on the Local Area Connection as needed. The SharePoint Server 2013 Preview prerequisite installer must download and install components from the Microsoft Download Center. For example, if the network that has access to the Internet uses DHCP, configure the Internet Protocol version 4 (TCP/IPv4) component from the properties of the Local Area Connection in the Network Connections folder to use automatic addressing and to automatically configure a DNS server.
- On WFE1, navigate to the drive or folder that contains the SharePoint Server 2013 Preview installation files and double-click SharePointServer.exe (for the evaluation version) or default.hta (from the SharePoint Server 2013 Preview product media).
- On the SharePoint Server 2013 Preview Start page, click Install software prerequisites.
- On the Welcome to the Microsoft SharePoint 2013 Preview Products Preparation Tool page, click Next.
- On the License Terms for software product page, review the terms, select the I accept the terms of the License Agreement(s) check box, and then click Next.
- On the Installation Complete page, click Finish.
- The computer might restart to install some of the prerequisites. After it does, the Products Preparation Tool will run again and install the remaining prerequisites. The computer must be restarted again to install these prerequisites.
- On the Installation Complete page, click Finish.
To install SharePoint Server 2013 Preview
- On the SharePoint Server 2013 Preview Start page, click Install SharePoint Server.
- On the Enter Your Product Key page, enter your product key as needed, and then click Continue.
- On the Read the Microsoft Software License Terms page, review the terms, select the I accept the terms of this agreement check box, and then click Continue.
- On the Server Type tab, click Complete, and then click Install Now.
- When Setup finishes, a dialog box prompts you to complete the configuration of your server. Ensure that the Run the SharePoint Products and Technologies Configuration Wizard now check box is selected.
- Click Close to start the configuration wizard.
- On the Welcome to SharePoint Products page, click Next.
- In the dialog box that notifies you that some services might need to be restarted during configuration, click Yes.
- On the Connect to a server farm page, click Connect to an existing server farm, and then click Next.
- On the Specify Configuration Database Settings page, type SQL1 in Database server, and then click Retrieve Database Names.
- Click SharePoint_Config in the Database name list, and then click Next.
- On the Specify Farm Security Settings page, type Passphrase, and then click Next.
- On the Completing the SharePoint Products Configuration Wizard page, click Next.
- On the Configuration Successful page, click Finish. The Internet Explorer tab shows the SharePoint 2013 Central Administration site. Leave Internet Explorer open.
- On APP1, in the Internet Explorer window for SharePoint Central Administration, in System Settings, click Manage servers in this farm and verify that WFE1 is part of the farm.
- On WFE1, from Internet Explorer and the Central Administration tab, for How do you want to configure your SharePoint farm?, click Start the Wizard. The Working on it page might display for a while before it completes and you might have to start the wizard again.
- On the Configure your SharePoint farm page, click Next.
- On the Create Site Collection page, in Title and description, from the URL list select "/" and then click OK.
- This step creates a team site.
- On the This completes the Farm Configuration Wizard page, click Finish.
- The Internet Explorer tab shows the SharePoint 2013 Central Administration site, from which you can configure and manage the SharePoint server
SPONSORS:
No comments:
Post a Comment